")
The Space-Saving Balcony Table You Can DIY at Home
If you’ve got a small balcony, you know how quickly it fills up. One chair, a few plants, and suddenly there’s no room left. That’s where a foldable balcony table comes in.
It gives you a spot for coffee, meals, or even a laptop. Then when you’re done, it folds away like it was never there.
The best part? You don’t need to be an expert to build one. This guide walks you through it step by step, using simple materials and basic tools.
Why a Foldable Table Works So Well
A fixed table can eat up precious space. A foldable one solves that problem.
Here’s why people love them:
- Saves space when not in use
- Easy to customize to your balcony size
- Budget-friendly compared to store-bought options
- Adds a clean, minimal look
What You’ll Need
Keep it simple. Most of these are easy to find at a hardware store.
Materials:
- Wooden board (for the tabletop)
- 2 folding brackets or hinges
- Wall anchors and screws
- Sandpaper
- Wood finish or paint (optional)
Tools:
- Drill
- Screwdriver
- Measuring tape
- Level
Step 1: Measure Your Space
Start by checking how much room you actually have.
Think about:
- How wide your table should be
- How far it can extend without blocking movement
- The height that feels comfortable when seated
A good rule is to keep it narrow but long enough for your needs.
Step 2: Cut and Prepare the Wood
If your board isn’t pre-cut, trim it to size.
Then:
- Sand the edges so they’re smooth
- Wipe off dust
- Add paint or finish if you want a polished look
Let it dry completely before moving on.
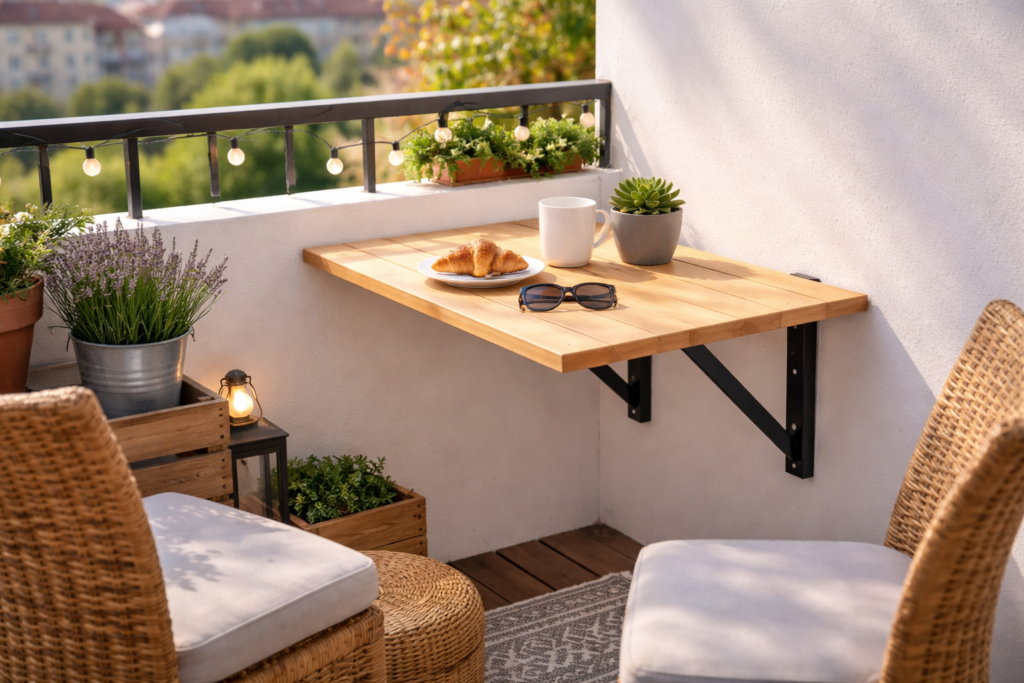
Step 3: Attach the Folding Brackets
This is what makes the table fold.
- Place the brackets under the board
- Space them evenly for support
- Screw them tightly into the wood
Make sure they fold smoothly before installation.
Step 4: Mount It to the Wall or Railing
Now it’s time to secure everything.
- Hold the table against the wall
- Use a level so it’s straight
- Mark where the screws will go
- Drill holes and insert wall anchors if needed
- Screw the brackets into place
Give it a gentle push to check stability.
Step 5: Test and Adjust
Fold it up and down a few times.
Check for:
- Smooth movement
- Strong support when open
- Any wobbling
Tighten screws if needed.
Simple Design Tips
You don’t need to overthink the design, but a few small choices can make a big difference.
- Round the corners for a softer look
- Use weather-resistant paint if it’s outdoors
- Match the color with your balcony setup
- Add a small lip edge to keep items from sliding
Common Mistakes to Avoid
A few things can go wrong if you rush it.
- Mounting without checking level
- Using weak brackets that can’t hold weight
- Skipping wall anchors on concrete or hollow walls
- Making the table too large for the space
Take your time and measure twice.
Final Thoughts
A foldable balcony table is one of those small projects that makes a big difference. It adds function without taking over your space.
You don’t need fancy tools or a big budget. Just a bit of planning and a free afternoon.
Once it’s up, you’ll wonder how you managed without it. Whether it’s morning coffee or a quiet evening snack, you’ve got yourself a perfect little spot.