")
Small Space Hack: DIY Lift-Top Coffee Table with Storage
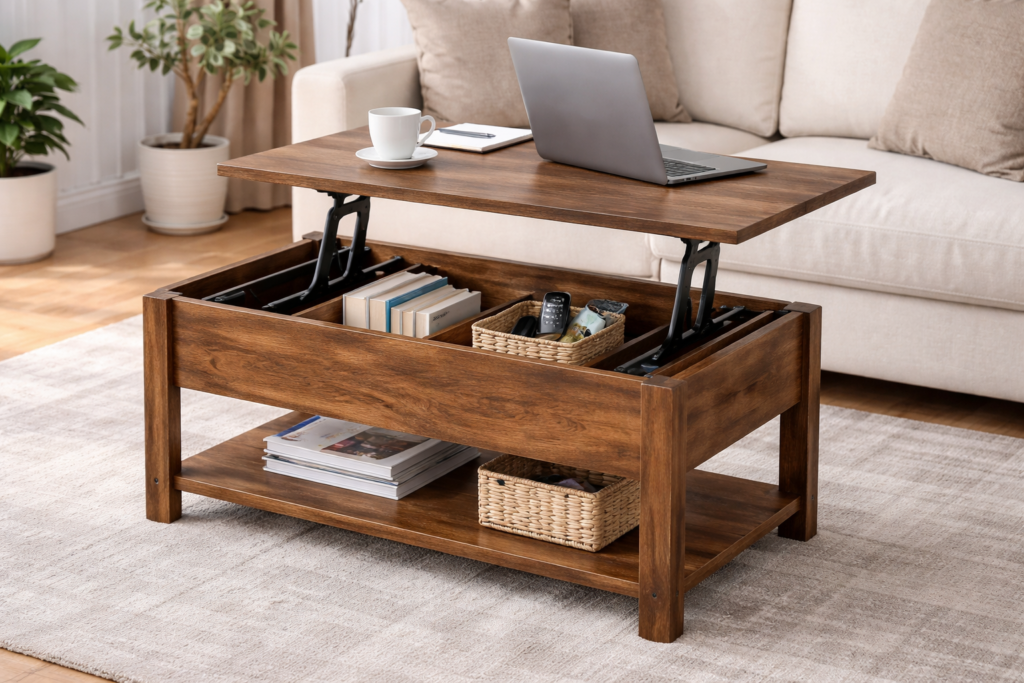
A coffee table is more than just a place to set your drink. With a lift-top design, it can double as a workspace, dining spot, or storage unit. If you’ve ever wanted a table that does more, this project is a great place to start.
In this guide, you’ll learn how to build a lift-top coffee table with storage inside. The steps are simple, the materials are easy to find, and the result is something you’ll actually use every day.
Why Build a Lift-Top Coffee Table?
Before jumping in, here’s why this project is worth your time:
- Saves space by adding hidden storage
- Gives you a raised surface for working or eating
- Costs less than buying a similar table
- Lets you customize size, color, and style
You don’t need to be an expert. If you can measure, cut, and screw pieces together, you can build this.
Materials and Tools You’ll Need
Materials:
- Plywood or solid wood boards (for top, sides, and base)
- Lift-top hinge mechanism (this is key)
- Wood screws
- Wood glue
- Sandpaper (medium and fine grit)
- Wood stain or paint
- Clear finish (optional)
Tools:
- Drill
- Saw (circular saw or hand saw)
- Measuring tape
- Clamps (helpful but optional)
- Screwdriver
- Paintbrush or cloth for finishing
Step 1: Plan Your Table Size
Start by deciding how big you want your table.
A common size is:
- 36–48 inches long
- 20–24 inches wide
- 16–18 inches high
Sketch a simple plan. Nothing fancy. Just enough to guide your cuts.
Step 2: Cut Your Wood Pieces
You’ll need:
- 1 top panel
- 1 bottom panel
- 2 long side panels
- 2 short end panels
Make sure your cuts are straight. Even small mistakes can make the table wobble later.
Tip: Label each piece lightly with a pencil so you don’t mix them up.
Step 3: Build the Base Box
This is the storage section.
- Attach the side panels to the bottom panel
- Use wood glue along the edges
- Secure everything with screws
Check that all corners are square before tightening fully. This keeps the table stable.
Step 4: Sand Everything Smooth
Before attaching the top, sand all surfaces.
- Start with medium grit
- Finish with fine grit
Focus on edges and corners so they feel smooth to the touch.
Step 5: Install the Lift-Top Mechanism
This is the part that makes the table special.
- Follow the instructions that come with your hinge hardware
- Attach one side to the inside of the table frame
- Attach the other side to the underside of the top panel
Take your time here. If the hinges are uneven, the top won’t lift properly.
Test it a few times before moving on.
Step 6: Attach the Top
Once the hinges are in place, secure the tabletop fully.
Open and close it several times to make sure:
- It lifts smoothly
- It stays level
- It doesn’t rub against the frame
If something feels off, adjust the hinges slightly.
Step 7: Paint or Stain Your Table
Now for the finishing touch.
- Use stain if you want a natural wood look
- Use paint if you want a modern or bold style
Apply in thin layers and let each coat dry before adding another.
Optional: Add a clear finish to protect the surface from spills and scratches.
Step 8: Final Check
Before using your table, do a quick check:
- Tighten any loose screws
- Test the lift mechanism again
- Wipe down dust or residue
Now it’s ready.
Tips for a Better Result
- Don’t rush the hinge installation
- Measure twice before cutting
- Keep your workspace clean to avoid mistakes
- Choose good-quality hinges for smoother lifting
Final Thoughts
Building a lift-top coffee table might sound complicated, but it’s really just a series of simple steps. Take your time, follow the plan, and focus on clean, careful work.
The best part is that you end up with something useful and personal. A table that not only looks good but works hard for your space.
If you’ve been thinking about trying a DIY project, this is a great one to start with.