")
Lift It Up: The Easy Way to Build a Ceiling Storage Loft at Home
Running out of storage is something most people deal with. Closets get full, shelves overflow, and suddenly every corner feels crowded. One simple fix is to use the space above you.
A drop-down ceiling storage loft gives you extra room for light items like boxes, seasonal decor, or rarely used gear. The best part is that it stays out of sight until you need it.
This guide walks you through the process in a clear, practical way. No complicated terms. Just steps you can follow.
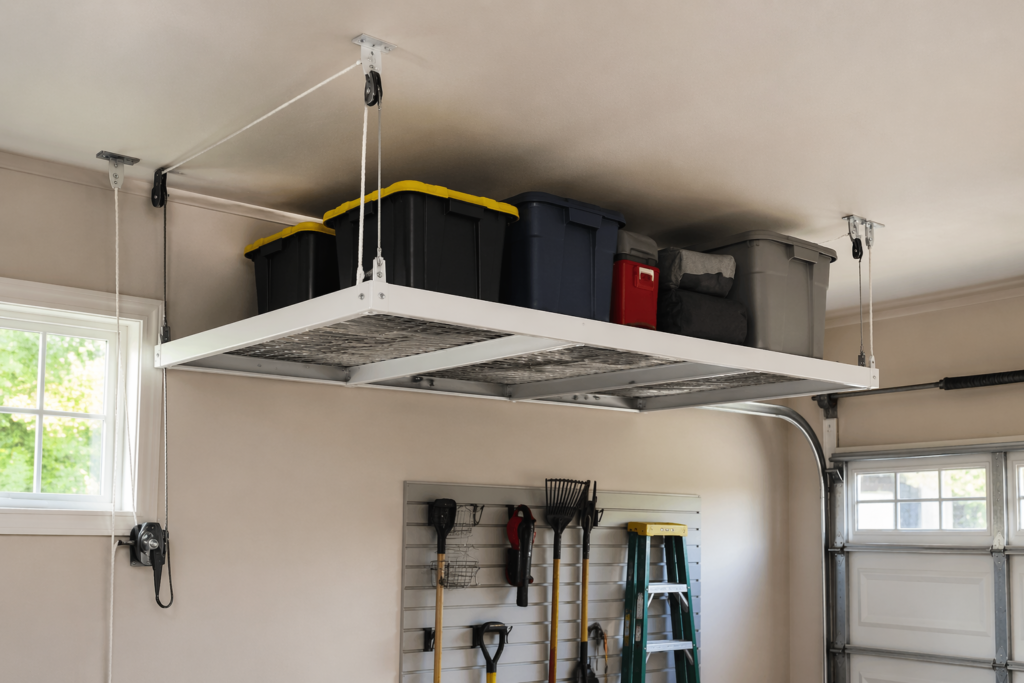
What Is a Drop-Down Ceiling Storage Loft?
It’s a suspended storage platform attached to your ceiling that can be lowered when needed and raised back up afterward.
Think of it as a hidden shelf that moves.
It works best for:
- Holiday decorations
- Storage bins
- Lightweight tools
- Old files or keepsakes
Avoid using it for heavy items. Safety always comes first.
Tools and Materials You’ll Need
Before you start, gather everything in one place:
- Measuring tape
- Pencil or marker
- Drill
- Stud finder
- Strong ceiling anchors or lag bolts
- Pulley system or lift mechanism
- Wooden or metal platform
- Rope or cable (rated for weight)
- Safety goggles
Don’t skip checking weight limits on your materials.
Step 1: Find the Right Spot
Look for a ceiling area that’s:
- Clear of lights or fans
- Easy to access
- Close to a wall or corner for support
Use a stud finder to locate ceiling joists. These are what will hold the weight. Never mount directly into drywall alone.
Mark the spots clearly.
Step 2: Measure and Plan the Size
Decide how big your loft should be.
Keep it practical. A common size is just enough to hold a few storage bins.
Measure:
- Width between joists
- Height clearance when lowered
- Headroom when raised
Sketch a simple plan before drilling anything. It saves mistakes later.
Step 3: Install the Support Anchors
Drill into the ceiling joists where you marked earlier.
Attach heavy-duty anchors or lag bolts securely. These will carry the load, so take your time here.
Give each anchor a quick pull test to make sure it’s firm.
Step 4: Build or Attach the Platform
You can either:
- Build a simple wooden frame with a flat base
- Use a ready-made metal rack
Make sure it’s:
- Even on all sides
- Strong enough for your items
- Not too heavy on its own
Attach hooks or eye bolts at each corner for the lifting system.
Step 5: Set Up the Pulley or Lift System
Install pulleys on the ceiling anchors.
Thread your rope or cable through the pulleys and attach them to the platform.
Test the movement:
- It should go up and down smoothly
- It should stay level when lifted
You can secure the rope to a wall cleat or hook when the loft is raised.
Step 6: Test Before Loading
Before putting anything on it:
- Lift and lower the platform a few times
- Check for wobbling
- Listen for any strain or creaking
Start by adding light items first. Don’t rush into full loads.
Safety Tips You Shouldn’t Ignore
- Always stay within weight limits
- Keep the platform balanced
- Check ropes and anchors every few months
- Don’t let kids operate the system unsupervised
A few extra checks go a long way in preventing accidents.
Simple Ideas for What to Store
Once it’s ready, here are some easy storage ideas:
- Labeled plastic bins
- Old photo albums
- Travel bags
- Seasonal clothes
- Spare bedding
Keep things organized so you’re not digging through everything each time.
Final Thoughts
A drop-down ceiling storage loft is a simple way to reclaim space without adding clutter. It doesn’t require fancy tools or expert skills, just careful planning and patience.
Take it step by step, don’t cut corners on safety, and you’ll end up with a clean, practical storage solution that blends right into your home.
If you’ve been looking for more space, it might already be right above your head.