")
DIY Entryway Mirror with Storage Hooks: Style Meets Everyday Function
Your entryway sets the tone for your home. It’s the first thing you see when you walk in and the last stop before heading out. If it’s cluttered or bare, it can feel a bit chaotic. The good news is you don’t need a full makeover to fix it.
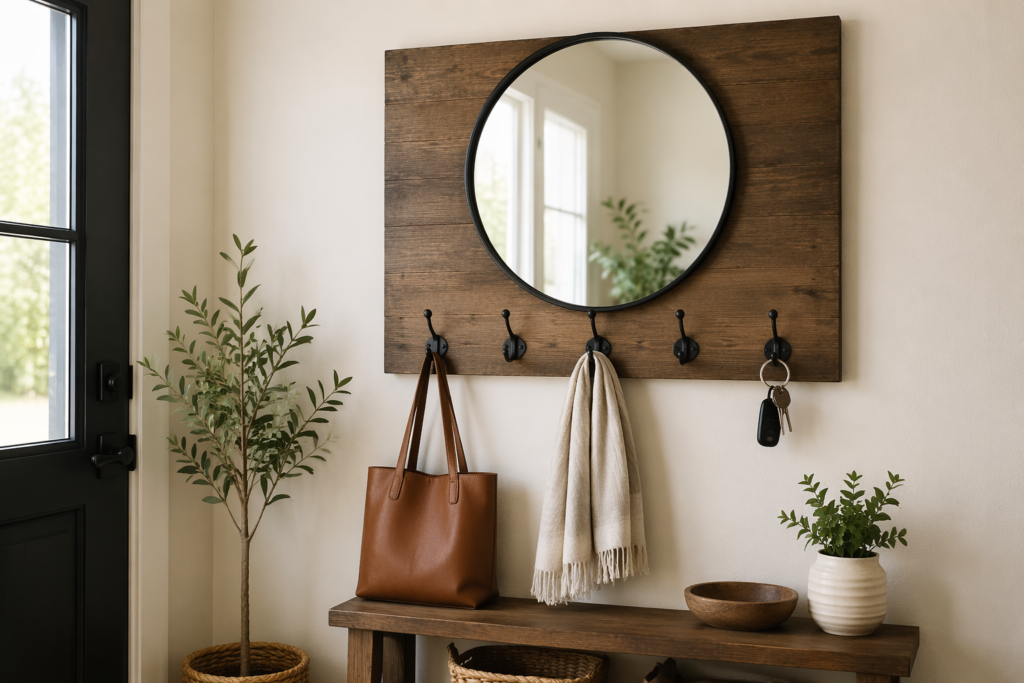
A DIY entryway mirror with storage hooks is one of those small projects that makes a big difference. It gives you a place to check your look, hang your keys, and keep bags off the floor. Best of all, you can build it yourself without fancy tools or a big budget.
Let’s walk through how to make one.
Why This Project Works So Well
This isn’t just about looks. It solves real, everyday problems.
- You stop losing your keys
- Bags and jackets have a proper spot
- Your entryway feels more put together
- You add a personal touch to your home
It’s practical, but it also looks good. That balance is what makes it worth doing.
What You’ll Need
You don’t need much to get started. Most of these are easy to find at any hardware store.
Materials:
- A wooden board (size depends on your space)
- A mirror (round or rectangular)
- Storage hooks (3–5 pieces works well)
- Wood screws
- Wall anchors (if needed)
- Sandpaper
- Paint or wood stain
- Strong adhesive or mirror clips
Tools:
- Drill
- Screwdriver
- Measuring tape
- Level
- Pencil
Step 1: Plan Your Layout
Before you start drilling anything, lay everything out.
Place the mirror on the board and decide where the hooks will go. A common setup is the mirror on top and hooks lined up below. Keep enough space between them so items don’t bump into the mirror.
Take a minute here. A good layout makes the final result look clean and balanced.
Step 2: Prep the Wood
Sand the board until it feels smooth. This helps the paint or stain go on evenly.
Then apply your finish:
- Use paint for a clean, modern look
- Use stain if you want something warmer and more natural
Let it dry fully before moving on. Rushing this part can mess up the finish.
Step 3: Attach the Mirror
Once the board is dry, secure the mirror.
You can:
- Use strong adhesive for a simple approach
- Or use mirror clips for extra support
Make sure it’s centered and level. This is the part people will notice first.
Step 4: Install the Hooks
Mark where each hook will go. Keep the spacing even.
Drill small pilot holes, then screw the hooks in place. Don’t overtighten or you might damage the wood.
Hooks are where the function comes in, so make sure they’re secure.
Step 5: Mount It on the Wall
Find the right spot in your entryway. Usually, eye level for the mirror works best.
Use a level to keep it straight. If you’re mounting on drywall, use anchors to hold the weight.
Once it’s up, give it a light tug to make sure everything is secure.
Styling Tips to Make It Look Finished
Once your piece is on the wall, a few small touches can make it feel complete.
- Hang a tote bag or jacket for a lived-in look
- Add a small bench or shoe rack below
- Place a plant nearby for a bit of life
- Keep it simple so it doesn’t feel crowded
The goal is to keep things easy and functional, not overdone.
Common Mistakes to Avoid
A few things can trip you up if you’re not careful:
- Placing hooks too close together
- Hanging the mirror too high or too low
- Skipping wall anchors for heavier setups
- Not measuring before drilling
Take your time and double-check your spacing. It saves a lot of hassle later.
Final Thoughts
This DIY entryway mirror with storage hooks is one of those projects that pays off every day. It keeps your space organized, adds personality, and makes your routine a little smoother.
You don’t need to be an expert to pull it off. Just a bit of planning, some basic tools, and a free afternoon.
Once it’s done, you’ll wonder how you managed without it.