")
DIY Guide: Installing Mesh Screens Behind Deck Lattice
If you have a deck with lattice skirting, chances are you’ve had a few unwanted visitors underneath it. Small animals like squirrels, raccoons, and stray cats love the dark, sheltered space under a deck.
One simple fix is installing mesh screens behind the lattice. The lattice keeps the deck looking nice, and the mesh adds a hidden layer that blocks animals while still allowing airflow.
The good news is that this is a beginner-friendly DIY project. You only need a few tools and a couple of hours.
In this guide, you’ll learn exactly how to install mesh screens behind deck lattice step by step.
Why Install Mesh Behind Deck Lattice?
Deck lattice looks great, but the openings are often large enough for animals to squeeze through. Adding mesh behind the lattice solves that problem.
Here are a few benefits:
-
Keeps animals from nesting under your deck
-
Blocks leaves and debris
-
Maintains airflow under the deck
-
Makes your lattice more durable
-
Improves the overall look from a distance
Best of all, the mesh is hidden behind the lattice, so the appearance of your deck stays the same.
Tools and Materials You’ll Need
Before starting, gather these supplies.
Materials
-
Hardware cloth or galvanized wire mesh (¼” or ½” works well)
-
Exterior screws or staples
-
Wood strips (optional, for extra support)
Tools
-
Tin snips or wire cutters
-
Drill or staple gun
-
Measuring tape
-
Work gloves
-
Safety glasses
Hardware cloth is the most common choice because it’s strong and rust-resistant.
Step 1: Measure the Lattice Openings
Start by measuring the sections of lattice under your deck.
Measure:
-
The height of the lattice panel
-
The width of each section
Write the measurements down so you can cut the mesh accurately. It helps to add about 1–2 inches extra on each side so the mesh overlaps the frame.
Step 2: Cut the Mesh to Size
Roll out the hardware cloth on a flat surface.
Use tin snips or wire cutters to cut the mesh according to your measurements. Always wear gloves because the cut edges can be sharp.
If you’re covering multiple panels, cut all pieces before installing. This saves time later.
Step 3: Position the Mesh Behind the Lattice
Place the mesh behind the lattice panel, not in front.
This keeps the mesh hidden while still blocking animals.
Make sure the mesh sits flat and covers the entire opening. If there are gaps around the edges, animals may still get through.
Step 4: Attach the Mesh Securely
Now it’s time to secure the mesh.
You can do this in a few ways:
-
Staple gun: Fastest option if attaching to wood
-
Exterior screws with washers: More secure for long-term use
-
Wood strips: Sandwich the mesh between the strip and frame
Attach the mesh every 6–8 inches along the frame so it stays tight.
Step 5: Reinstall the Lattice Panels
If you removed the lattice panels during installation, screw them back into place.
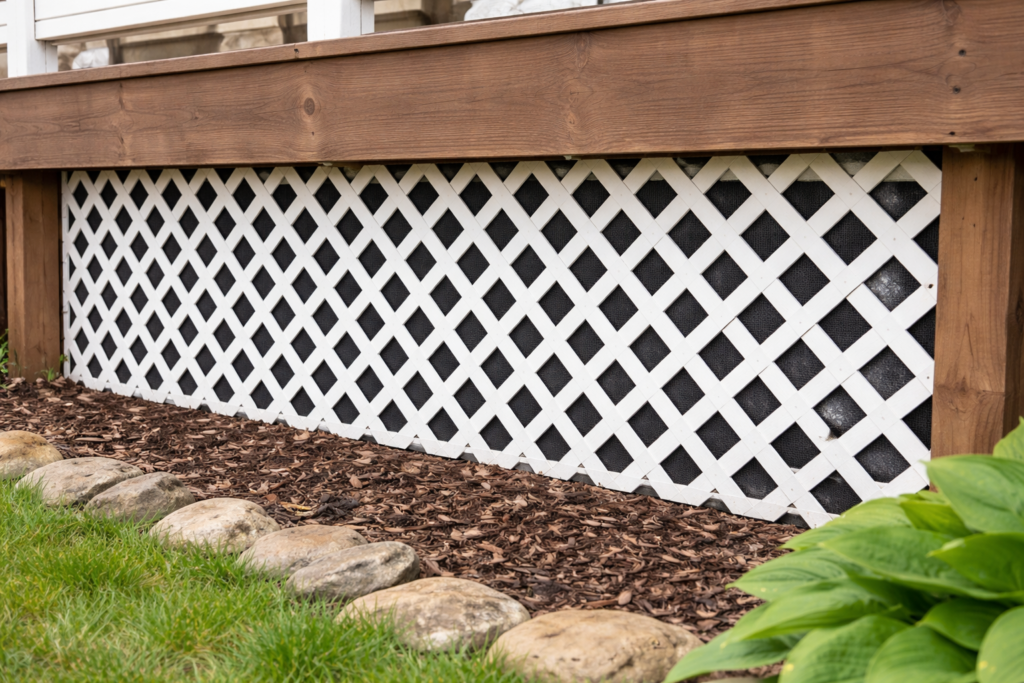
Once installed, the lattice hides the mesh completely. From the outside, your deck will look exactly the same, but it will now be protected underneath.
Extra Tips for a Cleaner Installation
A few small details can make your project look more professional.
Paint the mesh black
Black mesh blends into shadows and becomes almost invisible behind the lattice.
Check for ground gaps
If there’s a gap between the lattice and the ground, animals may still get under the deck.
Use smaller mesh openings
¼-inch mesh blocks mice and small rodents better than larger mesh.
Common Mistakes to Avoid
Even though this is a simple project, a few mistakes can cause problems later.
Leaving small gaps
Animals only need a tiny opening to get through.
Using lightweight plastic mesh
Plastic mesh can tear easily and won’t stop larger animals.
Skipping gloves
Cut mesh edges are sharp and can easily cut your hands.
Final Thoughts
Installing mesh screens behind deck lattice is one of the easiest ways to protect the space under your deck. It keeps animals out, improves airflow, and preserves the clean look of your deck skirting.
Most homeowners can finish this project in an afternoon with basic tools.
Once it’s done, you’ll have peace of mind knowing that raccoons, squirrels, and other critters won’t be turning the space under your deck into their new home.